Suddenly, I heard the Old Man’s drag running. It was not a noise I was expecting to hear while we were pecking away at a school of small stripers. There were some shad mixed in as well, but nothing had been bigger than 14″. I turned, “Shit, is that a real fish on?”
“I think it is.”
Clearly he was trying to contain his excitement. Neither of us had picked up anything bigger than a 24″-26″ fish since May and I could tell he was anxious not to jinx what was currently tugging his line out. He coaxed the fish away from the drop he had been working, and into the shallows where it continued to battle. I’m not sure exactly how long it took him to fight, it felt like at least ten or fifteen minutes, but I had time to pull in another schoolie and shad while attempting to find his fish’s big brother.
The fish, now landed, came in at just over 31″. Certainly it was no canal monster but for us fly fisherman, picking away at the scraps, it was a fantastic catch. Best of the season by a few inches. This was the best kind of trip, last minute. I realized I had some time, sent a text that I was going and folks could meet me if they wanted. The Old Man took me up on the offer and walked away with his best fish of the year.
Here’s a couple pics from the night:
Fat 31 incher
One of my measly shadDespite the tide coinciding nicely with my schedule in Sandwich tonight, I’ll be joining the weekly Bear’s Den crew down in Falmouth. I’m sure it will be a great night, regardless of fish caught.
The Old Man and I pulled into the small lot in Sandwich at almost exactly 4:30am. Dawn was just over the horizon and already the world was being illuminated. I had forgotten my headlamp and was worried I might struggle in the dark but clearly, that would not be an issue. We geared up the kayaks and launched just as Bruce arrived. He was on his own. We could already see a herd of boats sitting about a mile off shore and we were not waiting around for him to gear up. We began paddling towards the rising sun, witness to one of the finest mornings the Cape has seen this summer.
The water was flat and there was hardly a breeze. Unfortunately, there was a decent amount of weed in the water. I found myself frequently pulling in the line on both my fly and spin rods, which I had been trolling, to clear them of mung, grass and lettuce. Despite this, we made decent time and found ourselves cruising up to the boat herd within 15 minutes or so. Here we got our first blow to the day. It was easy to see that fish weren’t working the surface, even from a ways back. We were hoping that we could join up in some subsurface action with our best mackerel imitations.
The slog off shore proved futile though. We had hoped the boats were sitting over some stripers. Instead they were jigging for mackerel to take elsewhere. It was the second strike for the morning. The first being that neither of us (and Bruce we would later find out) had even a nibble on either fly or spin rods while trolling out. After a brief strategy session, it was decided that we’d cross the canal and try fishing the beach and breakwater.
In hindsight, that was a mistake. We should have hustled back to the truck and moved locations while we still had a dropping tide. The beach and breakwater offered nothing but a solitary tug on the Old Man’s fly rod. The fish never came back for seconds and we decided to scram. It was nearly slack tide on the bay side now and back in Buzzards Bay, the tide was already well into the flood. With no better ideas for a plan, we went back to Buttermilk Bay.
I really had no expectations. The small bay which, during the spring, offered days where more than 30 fish were caught and my first keepers of the year were taken, had calmed down. Because of that, I hadn’t fished it much as June carried on. It felt like a pond when we launched. The water was almost glass calm and the sun was beating down at that point. My expectations were not high.
At first it seemed like I was right. The incoming tide was pushing loads of weed into the bay making trolling nearly impossible. As we paddled around, searching out the areas we knew as having structure our casts provided nothing. Feeling discouraged, I consoled myself that it could not be a nicer morning for paddle. Then I had fish on. I could immediately tell that it was a small fish, about ten inches once I boated it. But it broke the dry day and at least put one on the board. A few casts later and I was on another one, this time a little bigger.
By now the Old Man and I had paddled up towards the entrance of the bay and the incoming tide was providing a decently strong current. Despite the sudden bite, both of us had other obligations for the day and we decided to let the tide push us back into and across the bay. As we drifted over a submerged sandbar we continued to cast with more success. I think my largest of the day was about twenty inches and I finished the day with seven in total, all within the last half hour. The Old Man also boated seven for the day, and managed one about twenty two inches.
Despite the fish, we had to call it a day. In many ways the morning was a disappointment. The Old Man and I have been on a mission for big fish. As much as I want to get it on the fly rod, I’ll take it on the spin. So far we have been eluded. With the new moon tide, and the influx of mackerel in the bay, we thought our odds were good and at least one of us would see a fish over thirty five inches. But, at least we weren’t completely skunked. The beautiful weather didn’t hurt either. I will never complain about a day spent on my kayak, next time I will remember to chart my journey via GPS so I can share it.
Yesterday was the 2017 summer solstice, the longest day of the year. While it’s sad to think that already the days will be growing shorter, summer is just starting and we still have another three maybe four months of solid striper fishing. I just need to break this slump I seem to be in.
I made it down to Sandwich last night. The incoming tide was less than desirable, and the wind was whipping off the back marsh made fishing the river nearly impossible. Relegated to the beach, I spent the next few hours in futility, retrieving my casts with nothing to show but some mung. A few other guys managed to scrape a couple small schoolies out of the surf but I wasn’t so lucky.
I knew of some folks down the road at Scorton creek, and I toyed with moving down there. Reports were that it was slow there too, only they were getting hammered with bugs. So by 9pm, I was back in the parking lot, beverage in hand. Brief consideration was given to continuing the night elsewhere but I decided to retire for the night and head home.
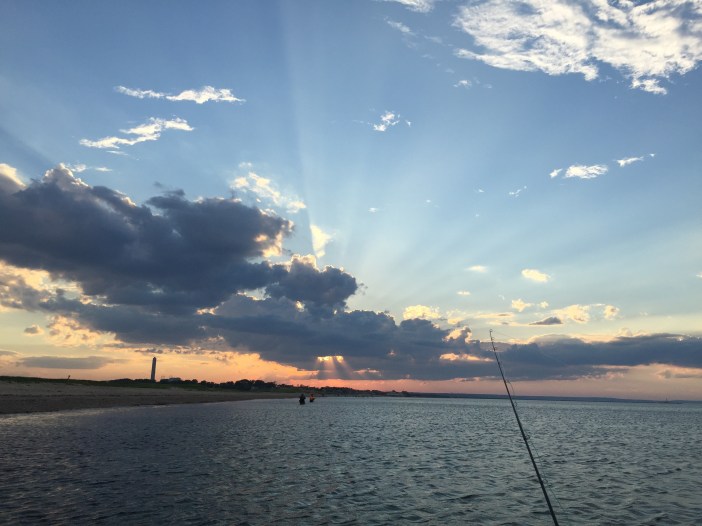
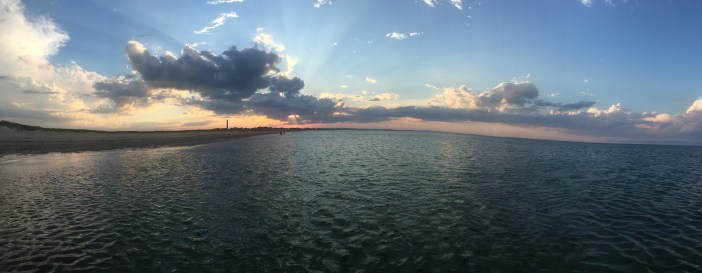
One of the great things about fishing Cape Cod is that even if the fish aren’t biting you still get some of the most beautiful vistas. Last night was no exception. Here are some photos:
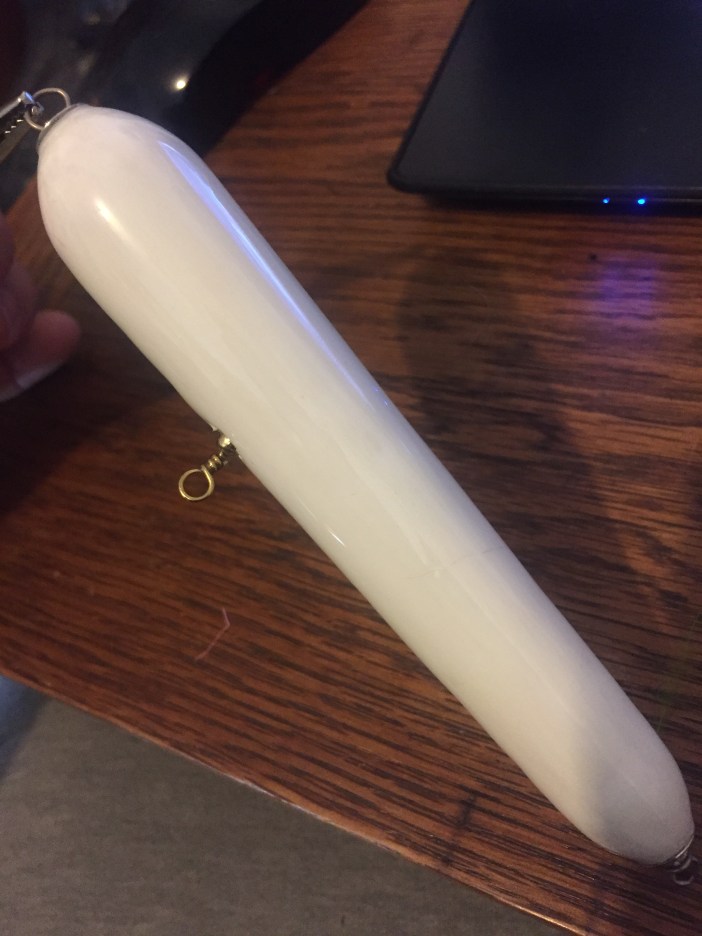
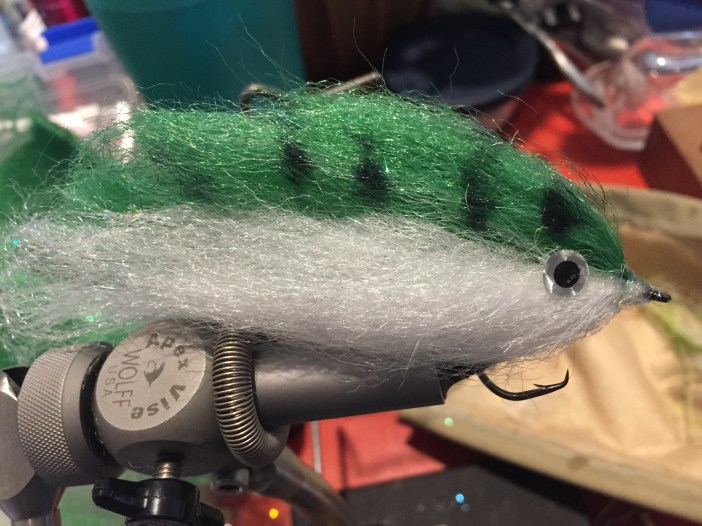
Striper season is well underway. And while I’ve done plenty of fishing (over 100 schoolies with 2 keepers mixed in), I have been terrible at updating this site. Never the less, a project which I started months ago, when stripers were merely in the thoughts that kept me awake at night has finally been completed. My first plug.
Back in February or March I had the wild idea of making some lures, or plugs as most surf guys call them. I don’t even spin fish very often but the idea of creating my own lures, fooling fish with my own creations, was too appealing to pass up. Also I had too much winter time on my hands and watched a few too many videos on the subject. Gears were turning in my head.
After I turned the blanks, I let them sit around for a while, distracted with other projects. I eventually ordered the hardware I needed to complete them and again let it all sit around a while longer. At some point I gave the blanks some paint and after again leaving them to age for another month, finally set about finishing them. Unfortunately I don’t have any in progress pictures, I’ll create a post for that in the future when I make my next one.
Only one blank passed muster and made it to final form. Even that one I thought was toast. I have enough wire for about twenty plugs though so I wasn’t too concerned if it didn’t work out. I think it did work out though; I think it looks pretty darn fishy. Check it out:
It weighs in at 1.38oz so while I’m sure it won’t set any distance records, I think it’ll do just fine. I’m sure if I find any blitzing blues on my kayak this will kill them. I have the hardware and plans to make more of varying designs so stay tuned.
Well…not really. Unfortunately my company gives me the ability to telecommute from home. While it’s nice not going into the office all the time, it doesn’t allow me the luxury of a true snow day. So while I watched the world outside my window turn white, I was forced to struggle through an overloaded network to get done what work I could. But that didn’t stop me from attempting a little fun.
First up, I spent some of my down time in between task working applying some face carving techniques I learned from a new video I found: https://www.youtube.com/watch?v=VinOD6g7xEc. Most of what Sharon does is similar to my own workflow when it comes to carving wood spirits or other faces. In part two however, I do like how she makes some pyramid cuts on the sides of the nose and connects them to the smile lines. I thought I would try. So I took out my totem stick, or at least the beginnings of it.
When it comes to carving faces, I make some I love, and some I hate. The two I have started on my stick are ok. I don’t love them, but neither are finished, so I think there is some room for improvement. Below is the new face I started after watching Sharon’s video:
This was somewhere between 5 and 10 minutes worth of work. In hindsight, the face is a little small in comparison its placement on the stick. But the totem is intended to be an organic, freehand practice stick so whatever. Unfortunately I didn’t get any further than roughing out the nose, mouth and eye sockets before the real world called and it was back to work on the computer.
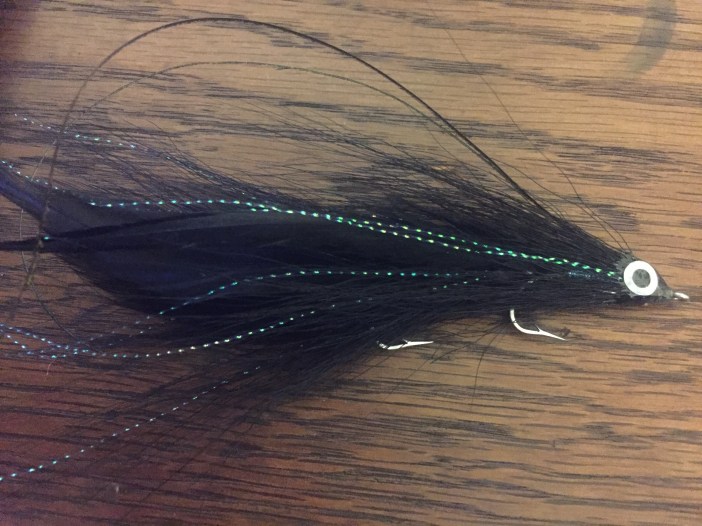
Hours later, in the afternoon when work had slowed slightly, I began to fidget again. I looked down at my fly tying bag and it looked back longingly. One fly can’t hurt right? I thought I would try a new variation that has been rattling around my head for a while: an articulated deceiver. Articulated flies have intrigued me lately. I see many designed for big pike and musky but I don’t see many in the striper world. Its certainly not needed at all, but a bit of extravagance doesn’t hurt once in a while and it would be a fun tie.
I went all black, with a big of blue bodi braid on the hook shank and the blue/green crystal flash. With the long hackles and big buck tail it measures about six inches in length, complete with eyes, a UV resin head and some peacock hurl to finish it off. If I were doing it again, I think I would extend the joint ever so slightly, maybe 1/4-1/2in but I’m happy with how it turned out. I can’t wait to fish it. It’s a big fly for spring so I suspect it will have to wait until the migration is in full swing before I can toss it with any hope of success. The black should work well at night, and I think I’ll tie a few others up in a variety of colors. Again, I was sucked back into my actual job and had to cease any further tying.
While it would have been nice to have a true day off, I will never argue with being able to work in sweat pants and slippers. In the office I might take a 10 minute break and walk around or chat with a colleague but at home, that’s a fly or two. In today’s case it was a fly, and a bit of whittling. As the day came to a close, the snow began to slow and eventually came to a stop. The wind continued to blow and the temperature dropped further. A pot of chili was made and stomachs filled. It wasn’t long before my wife dozed off after having filled her belly and I was left to my own devices. I hadn’t been outside all day and I really wanted to check out the snow. I figured at a minimum, I should shovel off my porch and stairs so I could at least leave the next morning. One thing led to another and found myself packing a pipe, grabbing my snowshoes and heading out into the night.
Its noon on Super Bowl Sunday. With no plans other than quietly watching the game with my wife, there is no prep to be done. Instead I was able to actually sit down and do a little tying this morning. While I wasn’t as productive as I would like, I was able to crank out a few flies, including two new patterns I’m experimenting with. I stopped to eat lunch and plan my afternoon, leaving me with the question: do I try to fish this afternoon? A quick look at the tides down in Providence and I see they are not optimal and the wind at my house is bad enough already, nevermind on the water. No holdover hunting for me today. There’s always some trout up at Whitings pond though…Anyways, here’s this morning’s ties:
I picked up some heavily discounted materials on http://www.MudHole.com a few months back, one of which being these gold dumbells with green eyes. While not really my first choice in colors, I couldn’t pass up the price. I thought I’d give them a try this morning. I have seriously slacked off on tying for months now so starting off with some easy (and always productive) chartreuse and white clousers also seemed like a good idea. I must admit, I liked the final product:
I fish clousers more than anything else in the salt. It’s almost annoying, I like trying new patterns, and sometimes I have success. More often than not though, even when attempting to “match the hatch” of whatever bait fish is currently around, I end up switching back to the clouser and catching. Its also a great searching fly, when nothing seems to be around its deep run will often pull up a fish. Again though, they can get a little boring, especially to tie. Warm up over.
I have some leftover zonker strips from the leaches I tied for the salmon river so I thought a zonker streamer would be a nice change of pace.
I’m confident this will catch fish and I like the black color. Unfortunately I used the last of my black crosscut rabbit zonker so I couldn’t tie another one. I think one or two more and I will have them looking very nice. I wasn’t pleased with how my anti-fouling strip came out. I might also look for some varied material. I’m now sure if it is available, but I would like to find some larger zonker material. It is a fun and simple material to work with, and its movement in the water is unreal. It breaths like no other material I’ve used, even better than maribou. I’m thinking that a slim version, with a red tail, small black head and no eyes could make for a deadly cinder worm imitation.
Along with the dumbell eyes, I also order some synthetic fiber that was on super clearance at Mudhole. It seems to be essentially the same as the infamous EP fiber so I thought I’d give a bait fish pattern a try. I experimented a bit last season with some bait fish patterns using some other synthetics I had. I was never overly pleased with the results I was getting and I never had any luck with them in the water.
While the packages are huge, and must last a long time, they are not the cheapest of materials so my collection was very limited. My previous failures did not encourage me to invest in more, until I saw the sale. This latest order added a new white, and two shades of green to the collection. With these new options, I attempted one more. I still need more practice working with the fiber, I don’t find it as easy as many tutorials claim it to be. Still, I am reasonably pleased with the end result. I used a short-shank Gamakatsu circle hook. These are another experiment since I found them for dirt cheap in the Wal-Mart fishing aisle. They seem to work well for these bait fish. It is a big fly, but I’m thinking it could pass as an early season herring and a may excel as a mid season mackerel over in Cape Cod Bay.
The above picture is when I first finished it. I need some bigger eyes, I’m thinking the 3D version rather than the flat holographic ones I have now. I wasn’t sure how I felt about the shape while it was still on the vise. I’d given it a small haircut, but couldn’t tell if it needed more. After running it under the faucet, it really came to life. Like I said before, it is a big fly. Not necessarily in terms of length (its maybe 3.75″) but it is a chunky beast. It has a good silhouette that I think will encourage some bass to come up from the deep to slam it. Running it under the water gave me a good idea of what it will look like in the water, with a nice tear-drop shape I would expect from a bait fish. Here it is below, though it doesn’t look as nice as it did while in the water):
Tying these flies gave me a great opportunity to start filling my new boat box. So far it has done nothing but begin to collect stickers.
I love this box. It’s a beast. I actually wish a bought a second to keep as general fly storage since it keeps them in better order than throwing them in a normal divided plastic box. I can’t wait to have this out in the kayak. I can’t wait to be back out in my kayak in general.
I’ll let my new flies call this home. I need to go through my box from last year and see what is salvagable. The salt is brutal on equipment and as much as I rinse everything off, it still has its way of destroying my flies over the season. I may move some of my favorites, and the bigger flies, over to this new box. Stay tuned.
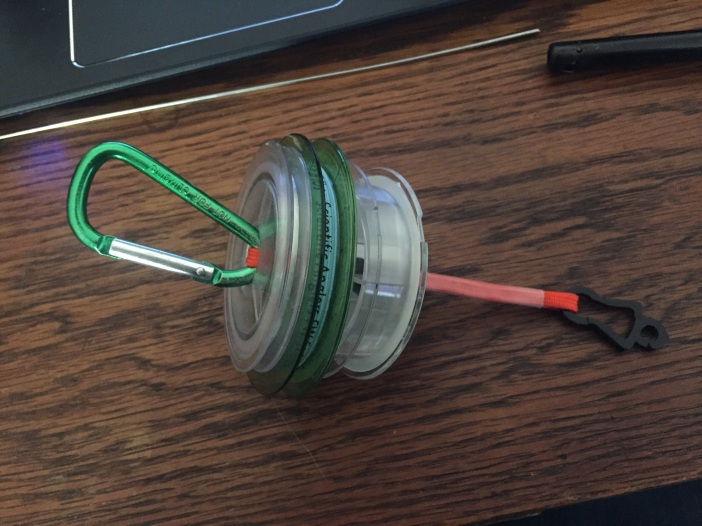
When it comes down to it, I’m a Yankee. If I can save something that won’t occupy much space and I think I’ll need in the future, you can bet its packed away somewhere. If I can build something rather than buy it, I’ll gladly buy the books/plans/tools required if it means I can make it to my specifications, maybe save some money and get new tools out of the deal. I like to bring that DIY attitude to any of my hobbies, fly fishing included. Fly fishing is a gear heavy sport, and almost none of it is cheap. Even the little odds and ends add up quickly. So when I started getting a few spools of tippet material I realized that I was going to need a holder of some sort. A brief google search brings up a myriad of choices, from the beautiful aluminum example by Fishpond to the simpler design that I would soon use as my template.
The Fishpond is sexy, no doubt about it. But at $20, it’s both a pricey, and over-engineered way to hold some spools. I looked at the simple design of the spool holder on the right, then at the price tag at Orvis. Immediately I thought: “phh…I can make that for free.”And, in the spirit of DIY, I thought I would share a little tutorial on how I made mine. I have gone through a couple revisions, and its not out of the question that it gets revised again, but I’m happy with the current model for now. I have a hodgepodge of tippet spools on it now. I think over the course of this season I’ll attempt to homogenize them a bit. For now though, they work fine.
Pretty sexy huh? I realize now that my photo isn’t the best since you can’t see the key component behind the spools. There is a drawstring button there to provide tension and keep the spools from sliding around, just like on the Orvis model. There isn’t much to it, I’ll lay out the materials below:
Approx 8″ paracord
1 Small Carabiner (the one I’m using is about 1″ (at its widest) x 1.5″ tall
1 small black clip (optional, it could even be another caribiner if you wanted)
1 piece of heat-shrink tube ( just larger than the paracord, I think I used 3/16″)
1 drawstring button
Other stuff:
Knife or Shears
needle-nose pliers
superglue
lighter
First you want to cut your length of paracord. I really didn’t measure this at any point. I just doubled up the cord and eye-balled how long I thought it should be. I turns out that I made my holder almost exactly 4″ long and I think that is a pretty good length, especially if you have a lot of tippet material. So to get 4″ of overall length while doubled up, you need 8″ total cord. Don’t burn the ends to keep them from fraying. You can see one end burned in the above photo, I actually cut this off and I’ll explain why in the coming steps.
Next you want to pull the inner portion of the paracord out. I’ll be honest here, the very first version I made of this, I did not remove the inner part and I like the diameter of the final product. What made me go back and remove the inside, is that my drawstring button isn’t big enough. So if you can, I might suggest experimenting a bit and see what works best for you.
Now that the innards have been removed, we can join our cord together. I did not want any sort of external knot that might impede the loading of spools and over all I think it looks much cleaner this way. Finding the approximate center of the cord, I double over one side and bring the end to the center. With a couple dabs of super glue to hold it, we can move to the other side and do the same thing. This step is why I recommend not burning the ends. the soft ends are allowed to compress and the final product wont have a lump in the middle.
It should look like this now, with the seam approximately in the center and each end formed into an open loop. The less super glue used, and the cleaner its application the better. I think even here I used a little too much but it doesn’t bother me enough to go back and change it. I also kept any twisting of the cord to a minimum. It lays nice and flat.
Now you can trim the heat-shrink tube to length. Leaving enough clearance for the loops on each end. (I really recommend finding long tube that you cut rather than using two smaller tubes. The seam that is created in the middle doesn’t play well with the drawstring button.)
You can see in the above picture I’m using a piece of braided line to pull the cord into the tube. This was a tight fit but it wasn’t much trouble to pull through. I would recommend keeping the diameter of the heat-shrink tube as small as possible to keep an overall cleaner look at the end. It won’t be the end of the world if you have to grab a bigger piece though.
Here it is. The cord has been pulled through, but the tube has not been shrunk yet. I think it looks pretty good at this point but let’s go ahead and shrink it up. It’ll provide some stiffness and lock everything together. If you are not familiar with shrink tube, you can buy a box of it from Harbor Freight for a couple of dollars. If you are a hobbyist it will last you for years. All you have to do, is lightly run the lighter under it. You can also use a heat gun if you have one. As you run the lighter under it, keep the flame moving and rotate the cord. I like to start in the middle and work my way toward the ends.
It should now look something like this. You can see the spots inside, where I used the superglue. Like I said before, the cleaner the application of the glue, and the less you use, the better your final product will be. Also, if you use a colored shrink tube, it’ll hide some of this better. But that’s it. The only thing left to do attach the clips and slide on the button.
Here is the finished product. It seems to be working well so far. I took it on the Peters Pond outing from my previous post and while I didn’t need any additional tippet; I never noticed it dangling from my pack. I think that is the biggest testament. The last thing I want to is to feel this thing banging around while I’m walking or casting.
Some final thoughts:
As previous stated, this is the third revision, mainly because I found the long piece of shrink tube. My last version was identical except that I had used two short pieces and joined them in the middle. It seems like a small difference, but the button constantly got caught at the seam when I slid it up or down. It’s much smoother now with a single piece.
Early on I noted that I liked the final diameter of the holder when I left the inner cord intact. Unfortunately the only draw string button I have, won’t fit around it. So I’m going to keep my eye out for one that looks bigger. If I can find one, I’ll probably make a fourth version.
This was a ridiculously easy DIY project that probably didn’t warrant so many pictures or such a detailed explanation. But this was as much a practice for me to write a tutorial as it was an actual tutorial. Hope it helps.
I couldn’t hold out any longer. My fingers wouldn’t stop twitching, I was starting to get a pretty serious tick in my neck and I think I may have actually exhausted YouTube’s library of fly fishing videos. I had to get on some water. Really any water would do. I knew I was heading down towards to the Cape on Sunday to help my father rearrange his wood shop and figured I could convince him to go flail around on one of the many trout stocked ponds available on the Cape. In the end, we chose Peter’s Pond in Sandwich due to it’s easy and plentiful shore access and relative shelter from a growing wind.
Growing up, I fished a few of these Cape trout ponds for bass but had never encountered a trout since it was always summer, and the trout stayed well under the water column I’d be fishing (not that I knew what that was). I really wasn’t sure what to expect on this raw Sunday afternoon, but at the very least I’d get to explore and get some casting practice in.
By the time we arrived, there was a steady breeze. While we first investigated the beach located at the very northern point of the pond, there was no way we’d be able to cast more than a few feet into the steady headwind. My 4wt doesn’t provide much punch when it comes to cutting into a wind. We moved on to the boat ramp, located at the south east corner off Dunroamin’ Trail. Compared to the northern section of pond, this large cove was rather shallow. According to the chart we found, the center was 20′ compared to the 50′ depths located in the main pond. We began casting, working out way up the western shoreline.
I used this pond as an opportunity to try a new fly pattern I had been tying. The Dick Empie Golden Minnow, or “Goldie”. Made completey of Bills Bodi-Braid it almost gives the illusion of a gold or chromed spoon rather than any respectable fly. Perfect for blind casting into a pond. It wasn’t long, and we hadn’t moved far, before I had a decent take catch me off guard. I had been working a slow retrieve, keeping the fly close to the bottom but paying more attention to conversation. Once again, my master tactic of pretending indifference worked, and I had a decent fish on. Put one up on the board for the Goldie.
A quick fight, and I had it ashore. Measuring almost 20″, it was not only my first trout (in my life) but a decent specimen at that. After a few pictures and some brief awe, I quickly released it and was back on the rod. It only took a few retrieves before I lost my first Goldie to a snag on the bottom. Luckily I had more with me because once I tied a new one on the line, it only took a cast or two before I was into another fish. This one was smaller, maybe only 15″ but it fought harder than the first.
All in all, I pulled in three within about an hour. The old man unfortunately didn’t hook up with anything but a couple small perch. The afternoon was getting on, and the wind started to shift in our direction so after I lost another goldie to a snag and the bite died down we packed it in. I could not have asked for more. I went out with no hopes of anything other than escaping some winter boredom but instead caught my first three trout since I picked up this hobby. Despite the countless stripers, large and small mouth bass and bluegills I’ve caught on the fly, somehow I now feel closer to a “real” fly fisherman. Next up, pick up a river trout.
Really the only downside to my success on Sunday is that instead of alleviating my desire to fish and giving me some short term satisfaction, it has only served to light a fire under my ass. I’m already planning my week and deciding when I can get out again. I have more stocked trout close to me in Whitings Pond…and slightly more enticing, I’ve heard ok reports of holdover stripers in the Providence and Seekonk rivers.
Well that was fast. I was worried my laziness would take over, and apparently it only took two posts. I couldn’t even be bothered to write the followup to my two part Salmon River post. Between the holidays and my “real job,” it just slipped through the cracks. So, with the new year I would like to try this again. I’m still hashing this blog out. I’m sure there will be changes, as I determine what I most like to write about. Once the warm weather arrives here in Massachusetts, I will be fishing like a madman and I’m sure most of my posts will revolve around that. I hope to continue creating posts about cycling and woodworking as well. In years past, I have actually done the majority of my cycling in the winter. I’m generally not fishing, and I find the weather generally more pleasant to ride in. This winter though, I have failed. I’ve barely been on my bike so I feel I can’t really contribute anything worthwhile on that topic. So we shall see how this site evolves. If, after a few months, I realize that I’m not writing much about a particular topic, I’ll probably scrap it in favor of concentrating on the others.
Unfortunately, we are still a few months away from those first striper schoolies making their way into my waters. I am certainly hoping to make it out on some of these beautiful winter days to hunt either holdover stripers in the upper estuaries, or even make it out to the Swift River if I’m feeling extra ambitious. For now, I’ll just have to tie, stocking up my boxes for the spring and watch YouTube videos that serve only to feed my fever. The recent Fly Fishing Show in Marlboro, MA did the same. Drooling over the newest gear and picking up the odds and ends I needed, all while talking and mingling with some of the fly world’s greats surely gets the mind in a fury; already planning that first outing of the year.
Speaking of the Fly Fishing show, I really enjoyed this year’s. I was not there long, only a couple hours. It was enough though. I was able to drool over some dream outings in places like Labrador and Belize, pick up some EZ Body tubing from Bill Murphy, which I’ve wanted to play with for a while, and I was even able to show a friend and new-comer to the fly world around the show. He was overwhelmed, much as I was my first year attending, but was able to enjoy himself and get some great info. Really the only other notable mention, is that I found a big streamer/boat box for a great price at the Rip Lips booth and had to pick it up. I generally see these priced anywhere from $35-$45 and it’s too much. Fly fishing is an expensive hobby, there’s really no way of getting around that. But when I see the items that very clearly fall into the “fly fishing mark-up” category – cheap plastic fly boxes especially, I have a hard time stomaching it. So when I saw this box for nearly a third of the normal price I jumped on it. I love the Rip Lips booth, there isn’t a year that goes by that I don’t pick up some bargain items from them.
Since the show, the fishing fever is at a new high. Unfortunately I have no plans as of yet for any fishing in the near future. Stay tuned, however for a look at what flies I’ll use to fill that new box. I’ll also be fine tuning and tweaking my equipment over the next few weeks/months. I will do my best to keep this blog up to date.
It is already mid November and here in Eastern Massachusetts the fishing is winding down. The stripers and blues have mostly moved down the coast and while there are still scattered reports of success…I have not deemed it worth the drive to get out. Plus with the holiday season quickly arriving, chair repairs have dominated my Saturdays, leaving me precious little time to wet a line. Especially with the sun setting so early, I haven’t found the time to even hit some of the stocked ponds in the area or head west to the Swift river. Next week, this all changes.
I wrote that paragraph almost a week and a half ago. I intended on showing what flies I had been tying and my other preparations for my first trip out to the Salmon River in NY. Well I never got around to finishing it before the trip and now that I revisit the draft, it makes more sense to wrap my preparations into a 2 part post about the trip as a whole. This first post will be mostly the preparations, aka fly tying. I’ll follow that up with a rapid fire second post with a report of the trip itself.
As a mostly saltwater fly tosser, I spend most of my time tying big, bulky deceivers, clousers and other saltwater patterns that I typically use. Outside of wooly buggers and some bass poppers, my experience is limited. This trip then, gave me a chance to try out some new, albeit easy, patterns.
EGGS!
MORE EGGS!
The steelhead and even the salmon that are laying them, love salmon eggs. They are probably the number one fly or bait used on the river whether you are on the fly rod, center pin or even spin rod. For this trip I tied two main types the Glo-Bug, consisting of McFlyFoam and the Estaz egg.
It doesn’t get any more basic than the Estaz egg. Give the hook a base wrap, tie in the Estaz back near the bend then wrap forward towards the eye. The Estaz is like a coarse, shiny chenille so it really gives the egg an almost neon, glowing look to it. I tied some with some ultra-fine mono filament so nothing showed but the Estaz, and others like the green one pictured above I tied with some orange thread to give it a “hotspot”
The Glo-Bugs are a tad trickier, though after one or two I got the hang of them. Rather than attempt to explain my process here, I’ll just post the video that I followed. There are quite a few different videos on youtube for tying these, and like most other patterns, everyone has their own slight variations, myself included. With both the Estaz eggs and the Globugs, I tied them in sizes 8 and 10 in variety of colors: red, orange, pink, yellow and green. Your options are almost endless, I think both purple and blue would be great colors to keep on hand as well.
The other new pattern I tied was a bunny leech or zonker leech. Like many patterns, the name is derived from the pattern and what it imitates. In this case, some simple cross-cut rabbit fur. In principle it is incredibly similar to an albie/bonito pattern I was tying back in August and September. They are almost identical besides their scale. For this trip, like the army of wooly buggers I also tied, I used size 8 streamers from Gamakatsu. I had previously been using the Mustad equivalent and now I’m not sure I can go back. The Gamakatsu offers a slightly longer shank and somehow seems to be about twice as sharp. To me, in terms of river fishing, these bunny leeches are basically an improved wooly bugger. The rabbit fur has incredible movement in the water, it really gives the entire body the sense of life. In some cases I also experimented with using a maribou tail from a bugger and just using the rabbit fur to create the body instead of the chenille/hackle combination. Finally, much like you can do with the wooly bugger (and I did with a few of mine), it is easy to replace the cone (or bead) head with either an Estaz of Globug style egg to create the Egg Sucking Leech. Below are a few examples of mine:
That’s it. I didn’t tie any nymphs. No terrestrials, no other streamers, just eggs, leeches and buggers. Why? Mainly it comes down to time and money. Being so busy, my tying time was fairly limited and materials just for the eggs and leeches added up by themselves. I knew they were a secondary option on the Salmon river, and if I got up there and found that something I didn’t have was being slammed, there were plenty of shops where I could’ve picked up the flies I needed. I plan on spending time this winter on some more classic trout flies so stay tuned for future posts on the topic. For now, let’s just get out on the river.
Other preparations besides fly tying consisted of a trip to LL Bean to swap out my waders with a new pair. I purchased mine back in late April or early May, and I like them a lot. They were a massive step up from my old Hodgemans. They fit nicer, especially in the stocking foot and they have some amenities that I’d have a hard time living without now. Things like a small waterproof pouch on the interior for my phone and a fleece lined pocket for my cold hands. BUT, I only made it until August until they started to leak. It started when I’d exit the water and and maybe there was some water in them? It seemed like more than just sweat, despite the overbearing heat in those days. In the next few weeks I used the kayak as much as possible before the cold set in and it wasn’t until later in September that I took the waders out again. This time, I came out of the water wet. My right leg was most certainly wet…and cold. The last thing I wanted was to potentially be in 30 or 40 degree weather in NY with wet legs.
Luckily, there is an LL Bean store five minutes from my office and after tracking their stock for a few days, I saw they had a pair in my size and raced over. Ten minutes later I had new waders……and new line. Up until this trip, my 9 weight rod has been exclusively used for the salt. With the exception of one or two nights out on the Bell Road mud flats at the canal, I never felt a need for floating line. I was torn on this trip though. Fly line is expensive and I had already spent a fair amount getting ready. As I wandered through the Bean, killing time while the clerk retrieved my waders from the stock room, I came across some house brand line, marked down to $12. Twelve dollars. I was sure it would be garbage, but I knew I wasn’t casting far and for $12 I was willing to gamble.
Outside of the fishing gear, gathering supplies consisted of making some jerky, pre-mixing some manhattans for some river side imbibing and procurement of cigars. Warm clothes were packed and I was left to anxiously await my alarm at 4:30am.
![IMG_1396[1]](https://hookandspoke.com/wp-content/uploads/2017/06/img_13961-e1498678556573.jpg?w=702)
![IMG_1392[1]](https://hookandspoke.com/wp-content/uploads/2017/06/img_13921.jpg?w=702)
![IMG_1384[1]](https://hookandspoke.com/wp-content/uploads/2017/06/img_13841.jpg?w=702)
![IMG_1385[1]](https://hookandspoke.com/wp-content/uploads/2017/06/img_13851.jpg?w=702)
![IMG_1388[1]](https://hookandspoke.com/wp-content/uploads/2017/06/img_13881.jpg?w=702)
![IMG_1389[1]](https://hookandspoke.com/wp-content/uploads/2017/06/img_13891.jpg?w=702)
![IMG_1390[1]](https://hookandspoke.com/wp-content/uploads/2017/06/img_13901.jpg?w=702)